Showing posts with label frappe. Show all posts

Tuesday, 28 June 2016

How to create Offer Letter in ERPNext ?


Offer Letter which confirms the details of the offer of employment including job description, salary, benefits, paid time off, work schedule, reporting structure, etc.
ERPNext allows you to record offer letters that you provided to your candidates.
Follow the below step to create New Offer Letter
1)Goto
Human Resources->Documents->Offer Letter->New

As you can see in the above figure,Select the Job Applicant(to whom you are offering job),Designation,Offer date,Status(Rejected/Accepted/Awaiting Response) and also enter offer terms and its description.Make sure to enter Terms and Condition also

2)After Entering all data Save and Submit the form

In the above figure you can see how we created new offer letter

3)Click on Print button to print the offer letter

Above figure shows the pre-defined print format of offer letter.


4)If the candidate Accept/Reject the offer letter then update the Status in his/her offer letter


How to create Job Openings in ERPNext ?


Job Opening is nothing but job vacancy. Using Job Openings you can make record of open vacancies in your company.
Follow the below steps to create New Job Openings in ERPNext
1)Goto
Human Resources->Job Opening->New

As you can see in the above diagram,In the Job Opening form enter the details of the job positions/vacation like Job Title and its Description. If job position is open then make sure to select Open in Status.After that Save the form


Attendance in ERPNext or How to create employee attendance in ERPNext ?

Attendance report gives information about how many employees has been present on particular day.
Follow these steps to create employee attendance in erpnext
1)Manually you can create employee  attendance on particular date in ERPNext
Goto
Human Resources->Attendance->New

As you can see in the above figure,in the attendance form choose the employee,attendance status(Present,Absent,Half Day) and Attendance Date. After entering all data Save and Submit the attendance form.
2)You can also upload bulk attendance by using Upload Attendance Tool
Goto
Human Resources->Upload Attendance

As you can see in the above figure, you can Import bulk attendance (CSV/Excel). Before importing you need to enter data in ERPNext attendance template. So first download Attendance Template and enter the data (refer instructions to enter data in template). After that import attendance data to ERPNext.You can see in below image to know how attendance template looks like


3)You can see Employee's monthly attendance report by going to the
Human Resources->Standard Reports->Monthly Attendance Sheet


Appraisal in ERPNext or How to create Appraisal in ERPNext ?

Appraisal is the systematic evaluation of the performance of employees and to understand the abilities of a person for further growth and development or performance evaluation of an employee over a particular period.
ERPNext allow you to manage employee’s appraisals by creating appraisal template for each role with the parameters.
Follow these steps to create Appraisal in ERPNext
1) Go to
Human Resource->Appraisal->New

As you can see in the above diagram,select the Appraisal template or you can also create new template by clicking Create a new Appraisal Template.

2)After selecting template the remaining form appears


3)In the Goals section
add goals,weight(in%) and Score(0-5)


4)After adding all goals and score Save and Submit the form.You can create appraisal record for each period where you can track employee performance.

In the above diagram you can see,Here we created an employee appraisal record for the month September.Like this you can create an employee appraisal record for each period.

Note:
1)To create New Appraisal Template goto
Human Resources->Appraisal Template->New

As you can see in the above diagram,in the appraisal template enter the title of the appraisal in Appraisal Template Title and also enter description.

In KRA(Key Result Area/Key Performance Area) add key parameters/goals and weightage(in %) and make sure that the overall KRA weight % should be 100%.After that Save the template


Tuesday, 14 June 2016

How to enter online transactions in ERPNext?

If you are selling goods online and you are receiving payments online through any payment gateways like Payumoney,Paytm,CCAvenue and you are paying TDS for that then here is the solution for how to enter online transaction in ERPNext.


Step1) Consider that if you are a selling a product for Rs 250 then you have to create sale invoice for Rs 250 only. Customer will pay full amount for that and TDS amount will be deducted when transaction completes(ie When you receive that amount in bank).
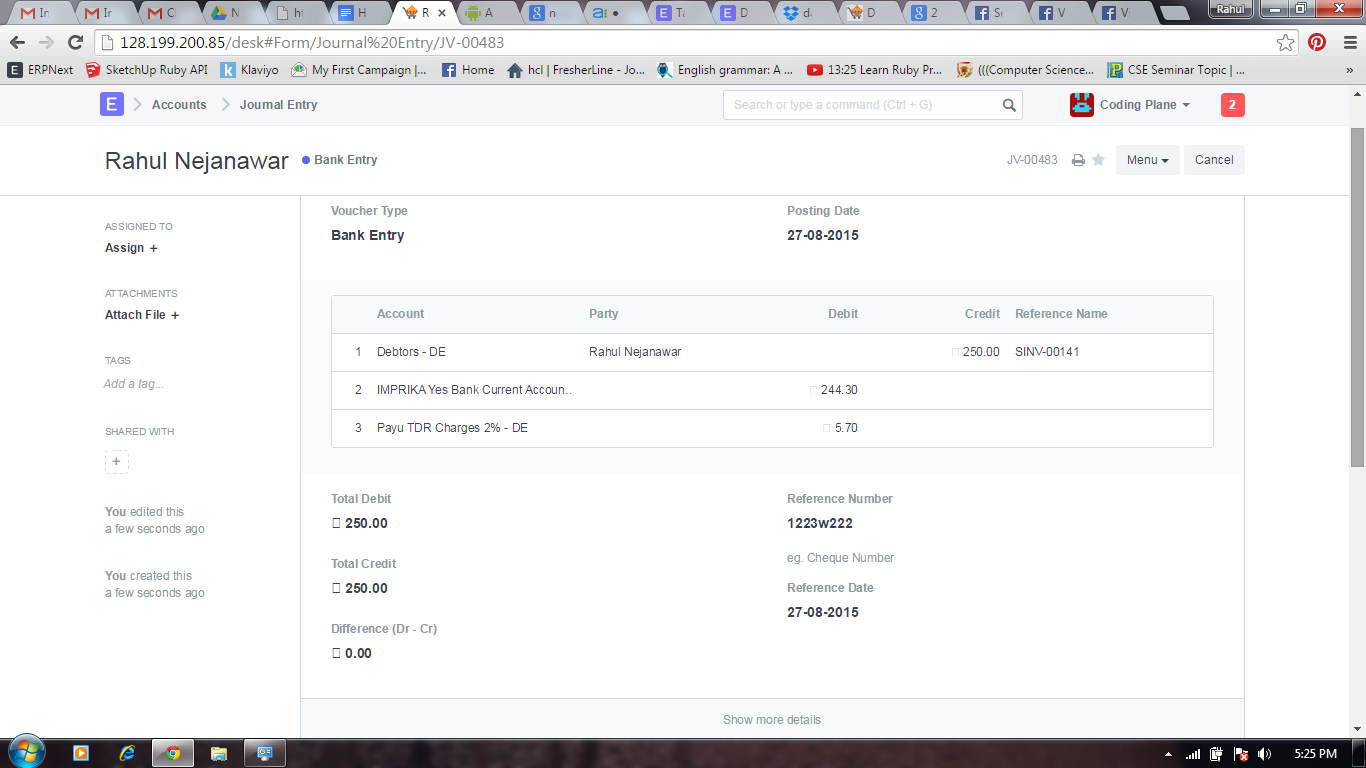
Consider that  you are using Payumoney payment gateway and payumoney charges 2% TDS and 14% tax on that. If customer pays 250 then payumoney charges 2% on that ie Rs 5 and 14% Tax on that ie Rs 0.7. Total Payumoney charges is Rs 5.7 and you will receive Rs 244.3 in bank.
Step2) While entering JV the Customer Account should be in credit side and your bank account should be in debit side and TDR charges will be in debit side.
mail12.png
Your JV should look like above.


How to create Journal Entry in ERPNext?

All types of accounting entries are made using the Journal Entry or Journal entry is an entry to the journal. Journal is a record that keeps accounting transactions in chronological order, i.e. as they occur. Ledger is a record that keeps accounting transactions by accounts. Account is a unit to record and summarize accounting transactions.
Follow these steps to create Journal Entry in ERPNext


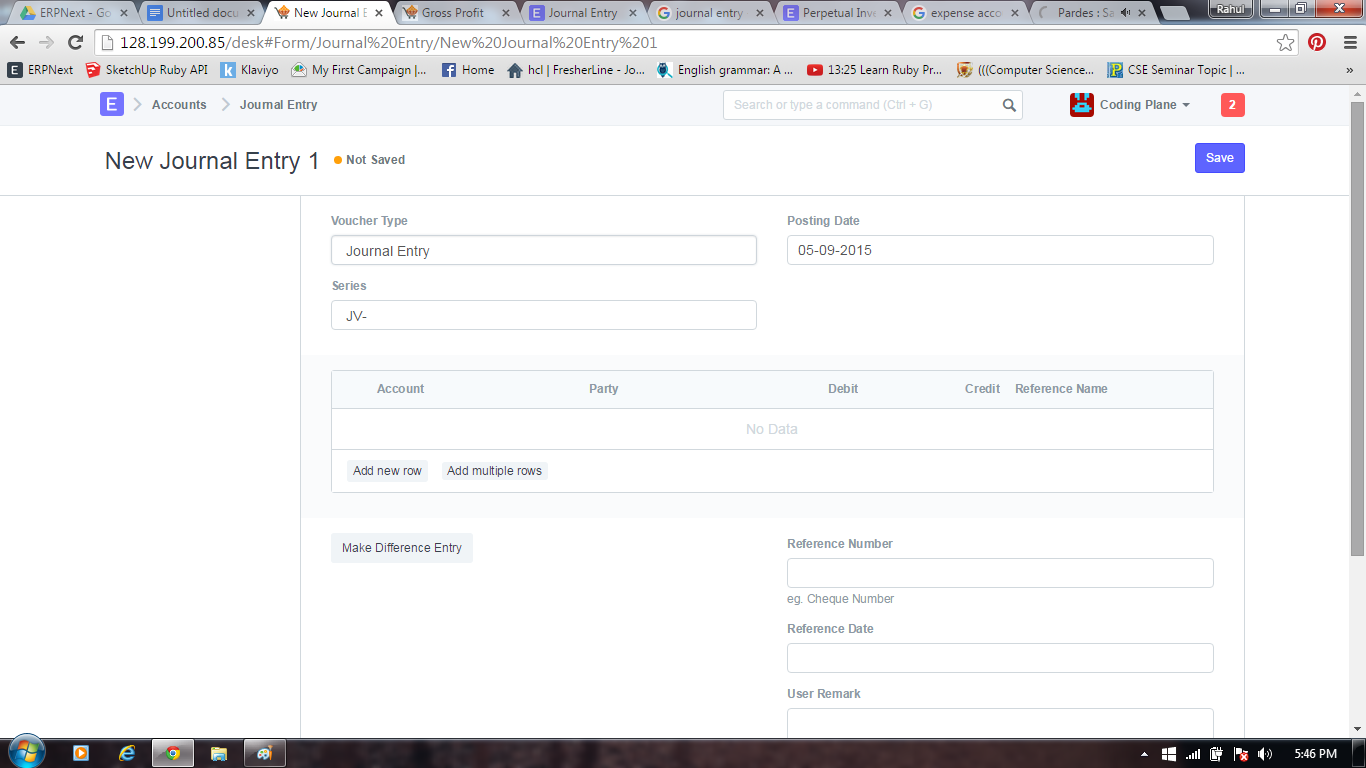
1)Goto Accounts->Journal Entry->New
mail67.png
you can see in the above figure,
In the New Journal Entry
Voucher Type-Here select the voucher type like if you doing entry for bank transaction then select Bank Entry or if you are entering cash transaction  then select Cash Entry in Voucher Type
Posting Date-On which date you are posting the JV/Journal Entry
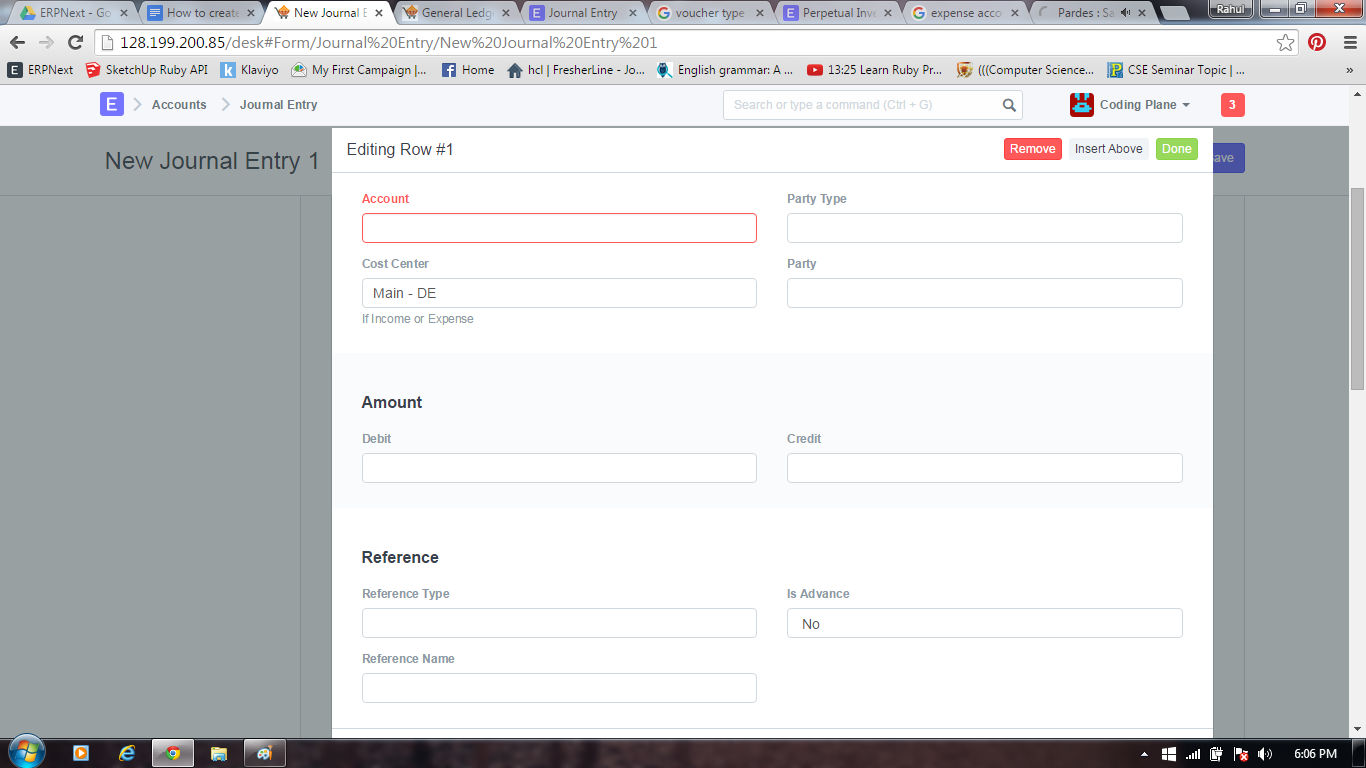
2)Add Accounts details in accounting field
mail68.png
In the above figure you can see
Account-Select respective account head
Party Type-Here Party Type means Supplier/Customer
Party-Select the party name
Cost Centre-Select Cost Centre for income/expense
Amount-Enter the amount to Debit/Credit
Reference Type-Select the reference type like sales invoice,purchase invoice,journal entry
Reference Name-Select the reference name like sale invoice no/purchase invoice no
Is Advance-Select “No” if you are not taking advance amount or Select “Yes” if you want to make selectable in an invoice.


3)After adding rows for individual account entries,Credit/Debit amount,Reference,the Journal Entry look like
mail69.png
In the above diagram you can see, Debitor and Creditor accounts and amounts. Creditor and Debitor amount should be equal, otherwise it will show difference amount in Difference field(Difference(Dr-Cr)) and also you cannot submit Journal Entry.


Difference(Dr-Cr)-The “Difference” field is the difference between the Debit and Credit amounts. This should be zero if the Journal Entry is to be “Submitted”. If this number is not zero, you can click on “Make Difference Entry” to add a new row with the amount required to make the total as zero.


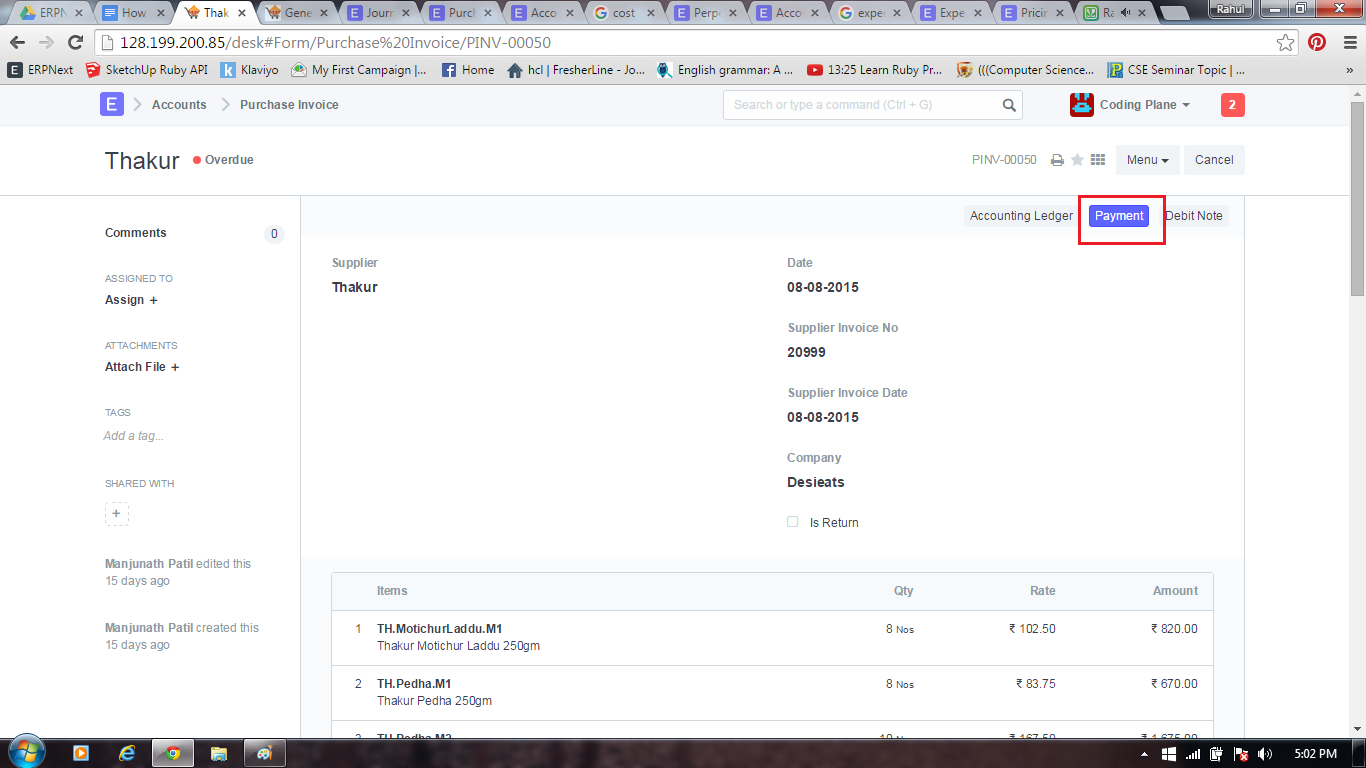
4)From Purchase Invoice/Sales Invoice you can create/generate Journal Entry/Payment Entry
mail66.png
In the above diagram you can see,you can create/goto Journal Entry by clicking Payment button in Purchase Invoice and it is same in Sales Invoice also.


5)Here you can see some common journal Entries for Food and Beverages/Telephone Bill/Rents
mail70.png

How to Setup ERPNext?

What is ERPNext?

ERPNext is a opensource cloud based ERP Software - that helps you to take full control of your business. ERPNext is simple and easy to use. ERPNext helps you to manage Accounts,Inventory,Purchase,Selling,Manufacturing,CRM(Customer Relationship Management),HRM(Human Resource Management),Project Management,Task Management and much-more. ERPNext wide range of options cover all features you need to run a small to medium business. You can also customise ERPNext based on your business process. Click here to know more about ERPNext

What is ERP?

ERP is an acronym for Enterprise Resource Planning. ERP is business process management software that allows an organisation to use a system of integrated applications to manage the business and automate many back office functions related to technology, services and human resources.