Showing posts with label sales invoice. Show all posts

Tuesday, 28 June 2016

How to create Customer in ERPNext ?

Customer is a person who buys goods or services from a shop or business or seller.
Follow below steps to create customer in ERPNext
1)You can create customer via
Selling->Documents->Customer->New
or
Accounts->Documents->Customer->New
or
CRM->Documents->Customer->New

In the above diagram we are going to create customer via Selling->Documents->Customer->New
In the Customer form add all customer details like
Full Name-Customer full name
Customer Group-Select the customer group like Individual,Commercial or you can create new customer group by clicking Create a new Customer Group in Customer Group field
Type-Here you can select customer type like Company/Individual
Territory-Here you can select customer territory. You can also create new territory by clicking Create a new Territory
From Lead-If customer came from lead then here you can select the lead
Tax ID-Here you can enter customer Tax Id
Customer Details-Here you can add customer details
You can also add other information like Currency,Price List,Credit Limit etc in Customer form
Sales Partner-Sales Partner is a 3rd party distributor/dealer/reseller who sells the company products, for a commission. Here you can add details of your sales partner or sales person like his/her commission,contribution,incentive etc
2)After entering all data save the customer form and the form looks like

3)When you create new customer,ERPNext will create Accounting Ledger automatically for customer under Account Receivable in the Company set in the customer record.
4)You can also create Customer while entering new Sales Order/Delivery Note/Sales Invoice

In the above figure you can see while creating new Sales Order we can create a new Customer by clicking create a new Customer in Customer field.


Tuesday, 14 June 2016

How to enter online transactions in ERPNext?

If you are selling goods online and you are receiving payments online through any payment gateways like Payumoney,Paytm,CCAvenue and you are paying TDS for that then here is the solution for how to enter online transaction in ERPNext.


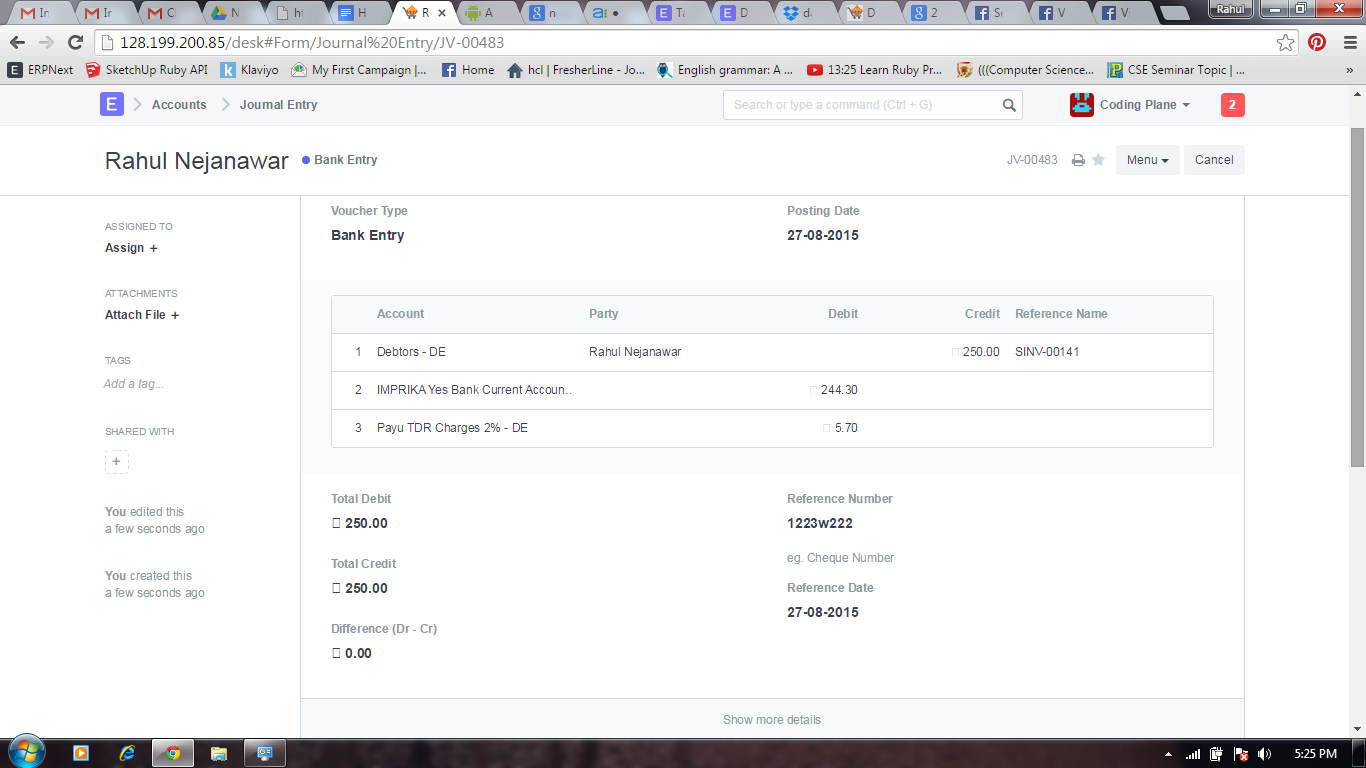
Step1) Consider that if you are a selling a product for Rs 250 then you have to create sale invoice for Rs 250 only. Customer will pay full amount for that and TDS amount will be deducted when transaction completes(ie When you receive that amount in bank).
Consider that  you are using Payumoney payment gateway and payumoney charges 2% TDS and 14% tax on that. If customer pays 250 then payumoney charges 2% on that ie Rs 5 and 14% Tax on that ie Rs 0.7. Total Payumoney charges is Rs 5.7 and you will receive Rs 244.3 in bank.
Step2) While entering JV the Customer Account should be in credit side and your bank account should be in debit side and TDR charges will be in debit side.
mail12.png
Your JV should look like above.


How to create Journal Entry in ERPNext?

All types of accounting entries are made using the Journal Entry or Journal entry is an entry to the journal. Journal is a record that keeps accounting transactions in chronological order, i.e. as they occur. Ledger is a record that keeps accounting transactions by accounts. Account is a unit to record and summarize accounting transactions.
Follow these steps to create Journal Entry in ERPNext


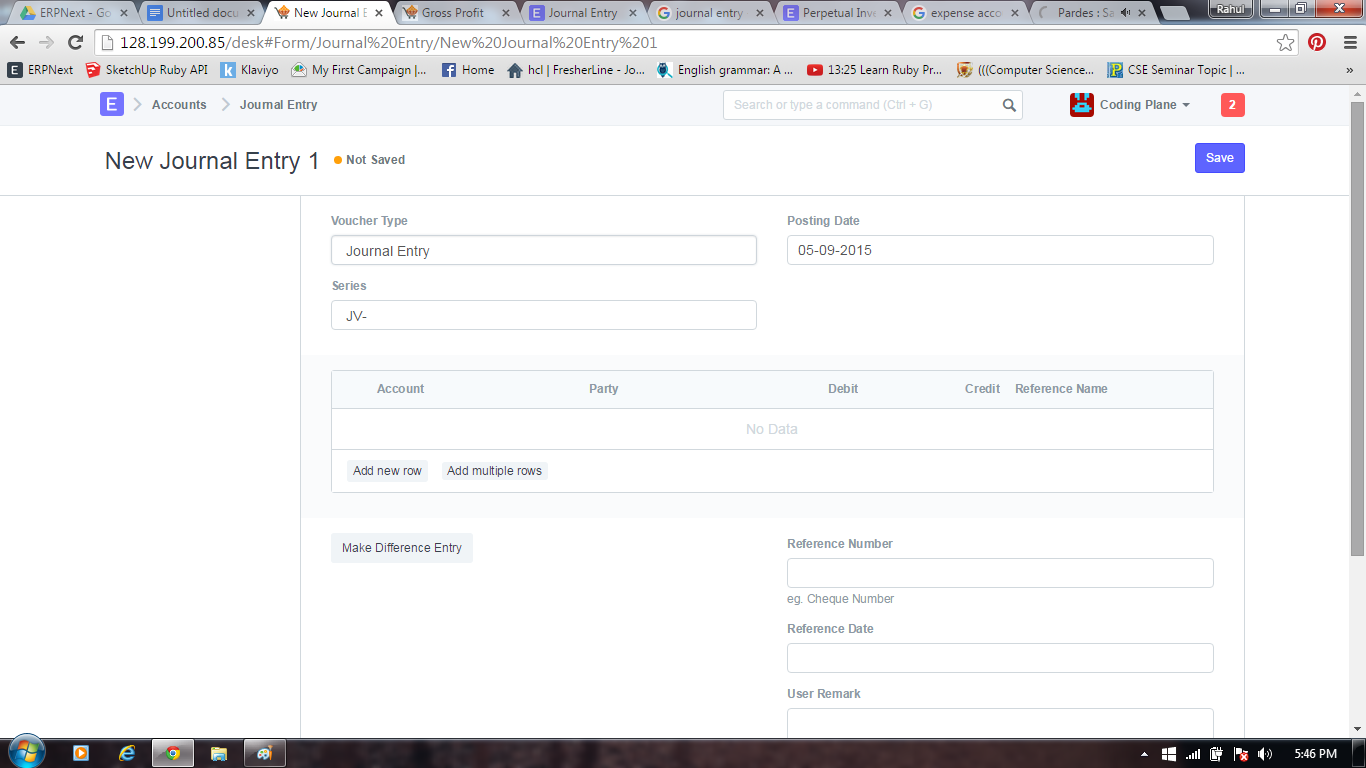
1)Goto Accounts->Journal Entry->New
mail67.png
you can see in the above figure,
In the New Journal Entry
Voucher Type-Here select the voucher type like if you doing entry for bank transaction then select Bank Entry or if you are entering cash transaction  then select Cash Entry in Voucher Type
Posting Date-On which date you are posting the JV/Journal Entry
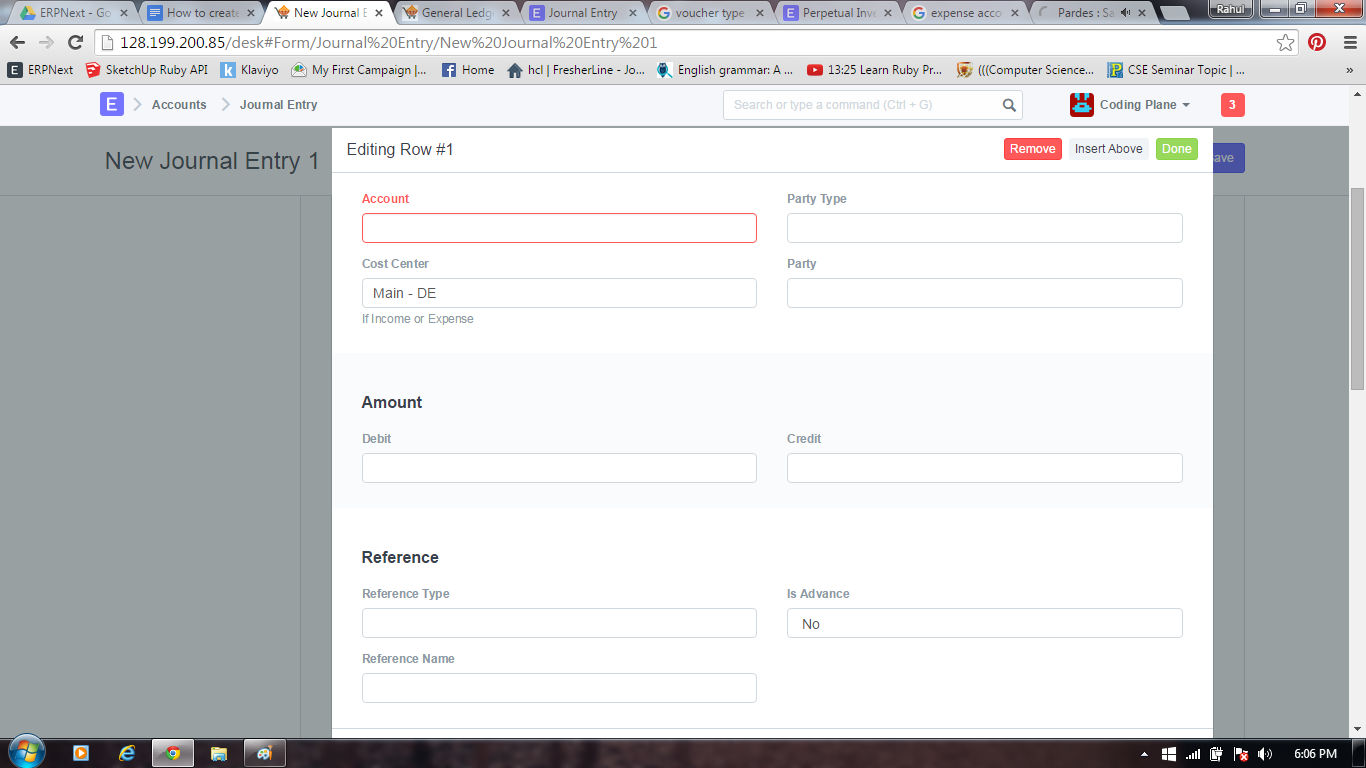
2)Add Accounts details in accounting field
mail68.png
In the above figure you can see
Account-Select respective account head
Party Type-Here Party Type means Supplier/Customer
Party-Select the party name
Cost Centre-Select Cost Centre for income/expense
Amount-Enter the amount to Debit/Credit
Reference Type-Select the reference type like sales invoice,purchase invoice,journal entry
Reference Name-Select the reference name like sale invoice no/purchase invoice no
Is Advance-Select “No” if you are not taking advance amount or Select “Yes” if you want to make selectable in an invoice.


3)After adding rows for individual account entries,Credit/Debit amount,Reference,the Journal Entry look like
mail69.png
In the above diagram you can see, Debitor and Creditor accounts and amounts. Creditor and Debitor amount should be equal, otherwise it will show difference amount in Difference field(Difference(Dr-Cr)) and also you cannot submit Journal Entry.


Difference(Dr-Cr)-The “Difference” field is the difference between the Debit and Credit amounts. This should be zero if the Journal Entry is to be “Submitted”. If this number is not zero, you can click on “Make Difference Entry” to add a new row with the amount required to make the total as zero.


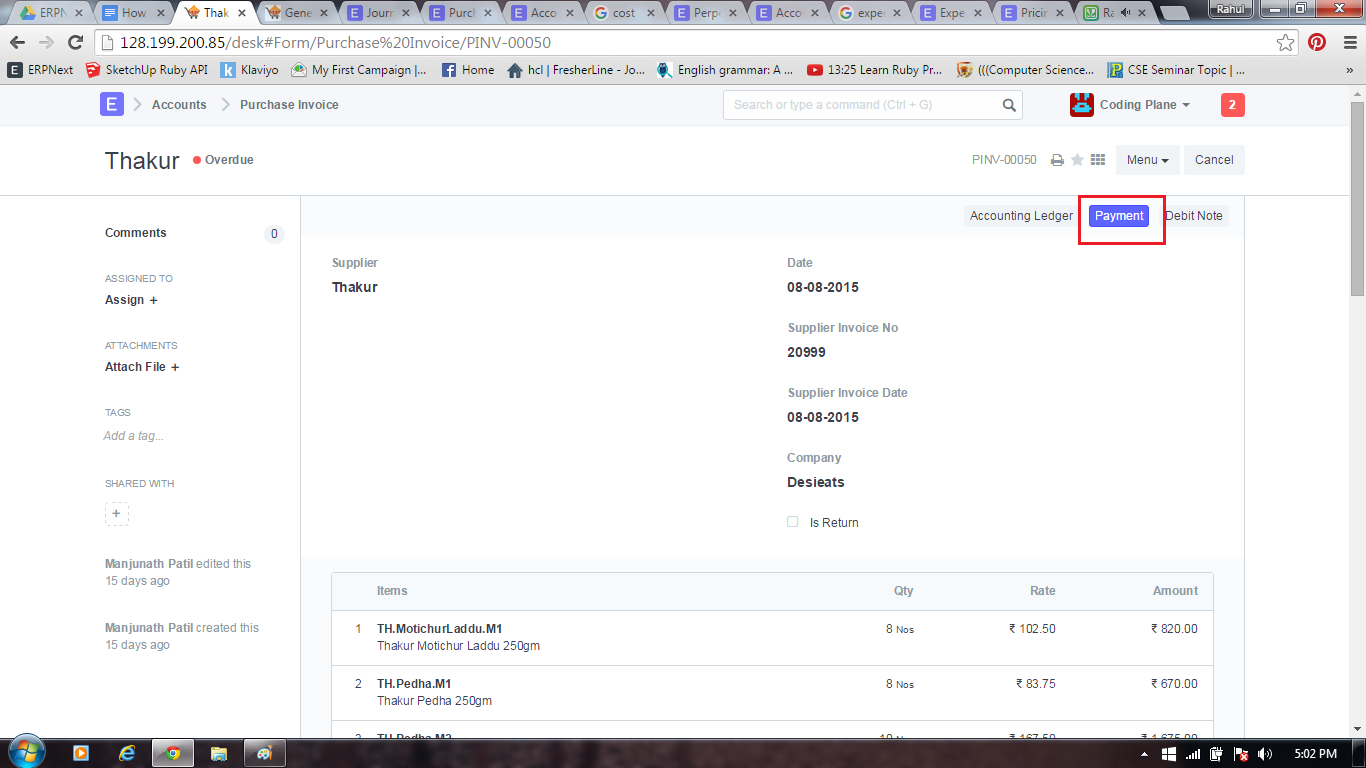
4)From Purchase Invoice/Sales Invoice you can create/generate Journal Entry/Payment Entry
mail66.png
In the above diagram you can see,you can create/goto Journal Entry by clicking Payment button in Purchase Invoice and it is same in Sales Invoice also.


5)Here you can see some common journal Entries for Food and Beverages/Telephone Bill/Rents
mail70.png

How to create Sales Invoice in ERPNext?

A Sales Invoice can be simply defined as the request of payment by the customer for goods sold or services provided the seller. An invoice generally lists the description and the quantity of the item sold or service provided. The document is also a record of the sale for both the seller and the buyer.
Follow the below steps to create New Sale Invoice
1)To create Sales Invoice
Goto Accounts->Documents->Sales Invoice->New
or
You can create Sales Invoice from Delivery Note/Sales Order
mail77.png
In the above diagram you can see,you can create Sales Invoice by clicking right side Invoice button in Sales Order(it is same in Delivery Note also)
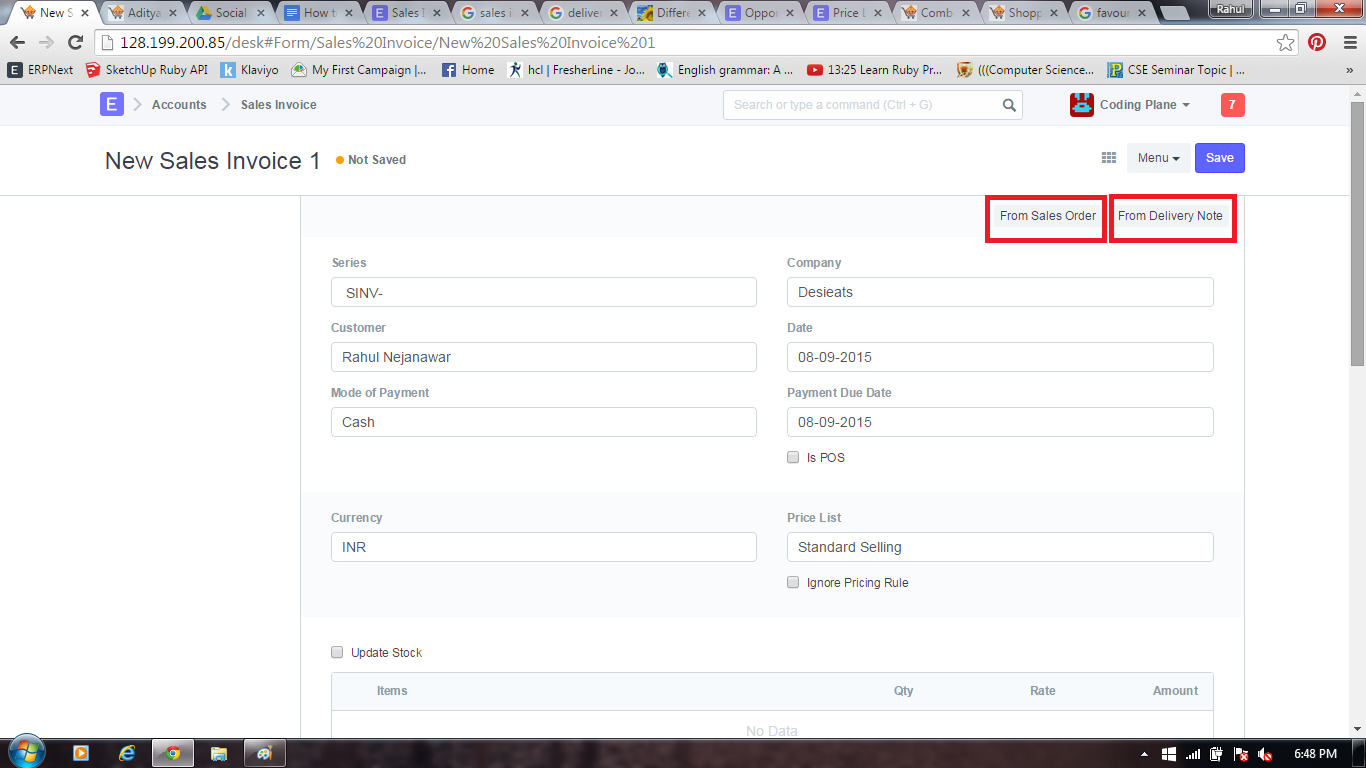
2)You can create Sales Invoice by pulling information from Sales Order/Delivery Note
mail78.png
In the above diagram you can see,We can create New Sales Invoice From Sales Order/Delivery Note.
3)You can also create Sales Invoice directly by
goto Account->Documents->Sales Invoice
The Sales Invoice requires
-Customer Details like customer name
-Mode of payment like Bank,Cash,Cheque
-Payment Due Date means the due date is always indicated and means that the payment must be received on or before the specified date
-Currency and Price List
-Item Details like Item Name,Qty,Rate,Income Account(You can set income account for each row or you can set income account for item in Item Master),Cost Centre(in which income booked)
-Taxes and Charges like Vat,Service charges
-Sales Partner Details

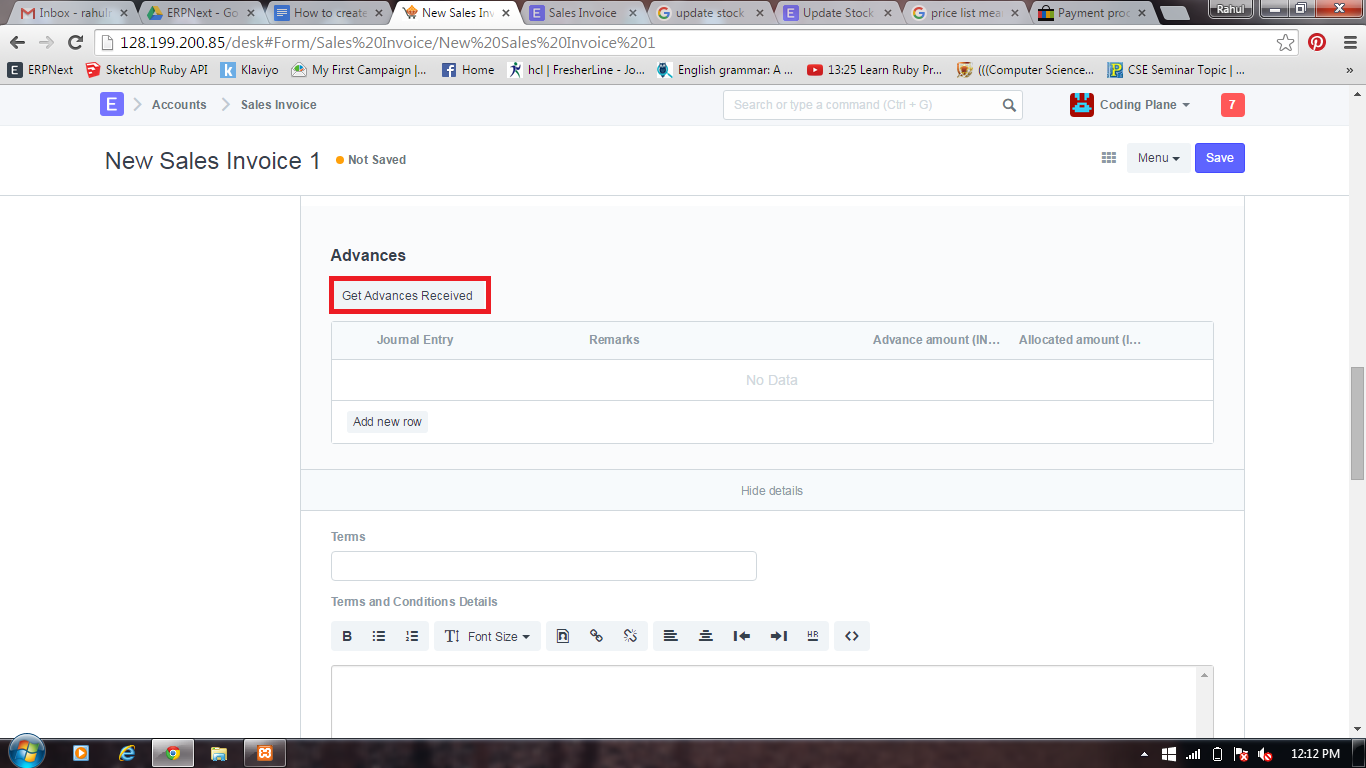
3)If you received advance amount for your sale then in Sales Invoice you can link that advances
mail79.png
In the above diagram you can see,By clicking Get Advances Received in advance field you can link advance payment Journal Entry to Sale Invoice.
4)Check Is Recurring in Recurring Invoice if you have contact with customer where you can bill on monthly,quarterly,annual basis.In the recurring invoice you add details about how frequently you send bill to your customer and the period for which your contract is valid. And ERPNext will automatically create new invoices and mail it to the mail ids you set.
mail80.png

5)After entering all data Save and Submit the Sales Invoice

What will happen after submitting Sales Invoice ?
-Sales Must be booked against Income Account. So that Income Account will be credited and Customer Account(Debtors) will be debited.You can check Accounting Ledger for that Sales Invoice by clicking Accounting Ledger in the right side of sales invoice.
mail81.png