Tuesday, 28 June 2016

How to create Opportunity in ERPNext ?

An Opportunity – is a contact which has been qualified. This person has entered into your buying cycle and is committed to working with you. You have already contacted, called or met him and know their needs or requirements. The old sales rule says: “The opportunity is a deal that you have the possibility to close!”
When you know your Lead is looking for some products or services to buy,you can track that as an Opportunity.
Follow these steps to create Opportunity in ERPNext
1)
Goto
CRM->Documents->Opportunity->New

or
You can create Opportunity from Lead

In the above diagram you can see you can create Opportunity from Lead.
2)In the Opportunity form you can select opportunity from Lead/Customer and you can select Lead/Customer for which you are going to create opportunity. Here you can also mention/select Status of the opportunity like Open,Lost,Replied and you can also select Opportunity Type like Sales and Maintenance


3)In the Opportunity you can also enter Item and Qty for which the Lead/Customer is looking

In the above figure you can see,
To add items in opportunity form then Check With Items. In Item Row add items with qty.
4)In More Info add Opportunity Date,Next Contact By,Next Contact Date and Source details
5)After entering all data Save the Opportunity form

In the above diagram you can see,From Opportunity you can create quotation by clicking button Create Quotation and you can also close the Opportunity.


How to Create Lead in ERPNext ?

Lead is potential customer,someone who can give you business.
Follow these steps to create New Lead in ERPNext
1)Goto CRM->Documents->Lead->New

In the Above figure you can see, How Lead form looks

2)In the Lead form you can add details about Lead ie
Person Name-Lead Name
Organization Name-The organization which lead belongs to
Source-How he got to know about your company like by Advertisement,Blogspot,Call,Website
Status-Status of the lead ie the person is interested/seeing opportunity
Lead Owner-Who is lead owner
Next Contact By-Person who is contacting to lead next time
Next Contact Date-On which date and time person is contacting to lead
Address & Contact-Here you can add lead address,Mobile No,website etc
More Info-Here you can choose Lead Type,Market Segment,Request Type etc

In the above figure you can see how we entered lead information

3)After entering all information Save the form

In the above figure you can see,When Lead is converted into Customer you can create customer from lead by clicking Create Customer in the right side of lead form. You can also create Opportunity and Quotation from Lead.

Note:
When Customer created from Lead then Lead status will become Converted.


How to create Customer in ERPNext ?

Customer is a person who buys goods or services from a shop or business or seller.
Follow below steps to create customer in ERPNext
1)You can create customer via
Selling->Documents->Customer->New
or
Accounts->Documents->Customer->New
or
CRM->Documents->Customer->New

In the above diagram we are going to create customer via Selling->Documents->Customer->New
In the Customer form add all customer details like
Full Name-Customer full name
Customer Group-Select the customer group like Individual,Commercial or you can create new customer group by clicking Create a new Customer Group in Customer Group field
Type-Here you can select customer type like Company/Individual
Territory-Here you can select customer territory. You can also create new territory by clicking Create a new Territory
From Lead-If customer came from lead then here you can select the lead
Tax ID-Here you can enter customer Tax Id
Customer Details-Here you can add customer details
You can also add other information like Currency,Price List,Credit Limit etc in Customer form
Sales Partner-Sales Partner is a 3rd party distributor/dealer/reseller who sells the company products, for a commission. Here you can add details of your sales partner or sales person like his/her commission,contribution,incentive etc
2)After entering all data save the customer form and the form looks like

3)When you create new customer,ERPNext will create Accounting Ledger automatically for customer under Account Receivable in the Company set in the customer record.
4)You can also create Customer while entering new Sales Order/Delivery Note/Sales Invoice

In the above figure you can see while creating new Sales Order we can create a new Customer by clicking create a new Customer in Customer field.


How to create Supplier in ERPNext ?

Supplier-A party that supplies goods or services. A supplier may be distinguished from a contractor or subcontractor or company or individual, who commonly adds specialized input to deliverables. Also called vendor. Follow below steps to create Supplier in ERPNext
1)You can create New Supplier in ERPNext vai
Buying->Documents->Supplier->New
or
Accounts->Documents->Supplier->New


2)In the Supplier form you need add Supplier Name,Supplier Type,Supplier Details
Supplier Name-Enter the name of the supplier
Supplier Type-Select the supplier type like Distributor,Electrical,Services,Local etc.
If you want you can also create New Supplier Type by clicking Create a new Supplier Type in Supplier Type

when you click on Create a new Supplier Type,you will get new window as shown below

As shown in above figure in New Supplier Type add new supplier type and credit days and save it.
You can also create New Supplier Type via
Buying->Setup->Supplier Type->New


3)Enter Supplier details in Supplier form and save it. After saving it looks like


4)When you create new supplier,ERPNext will create Accounting Ledger automatically for supplier under Account Payable in the Company set in the supplier record.

5)You can also create Supplier while entering new Purchase Order/Purchase Receipt/Purchase Invoice

In the above figure you can see while creating new Purchase Order we can create a new Supplier by clicking create a new Supplier in Supplier field.


Purchase Order Creation in ERPNext or How to create Purchase Order in ERPNext ?

You can create Purchase Order from Supplier Quotation and Material Request or We can Create Purchase Order directly by
1)Goto Buying->Purchase Order->New
In the Purchase Order select Supplier from which you are buying goods and add Items

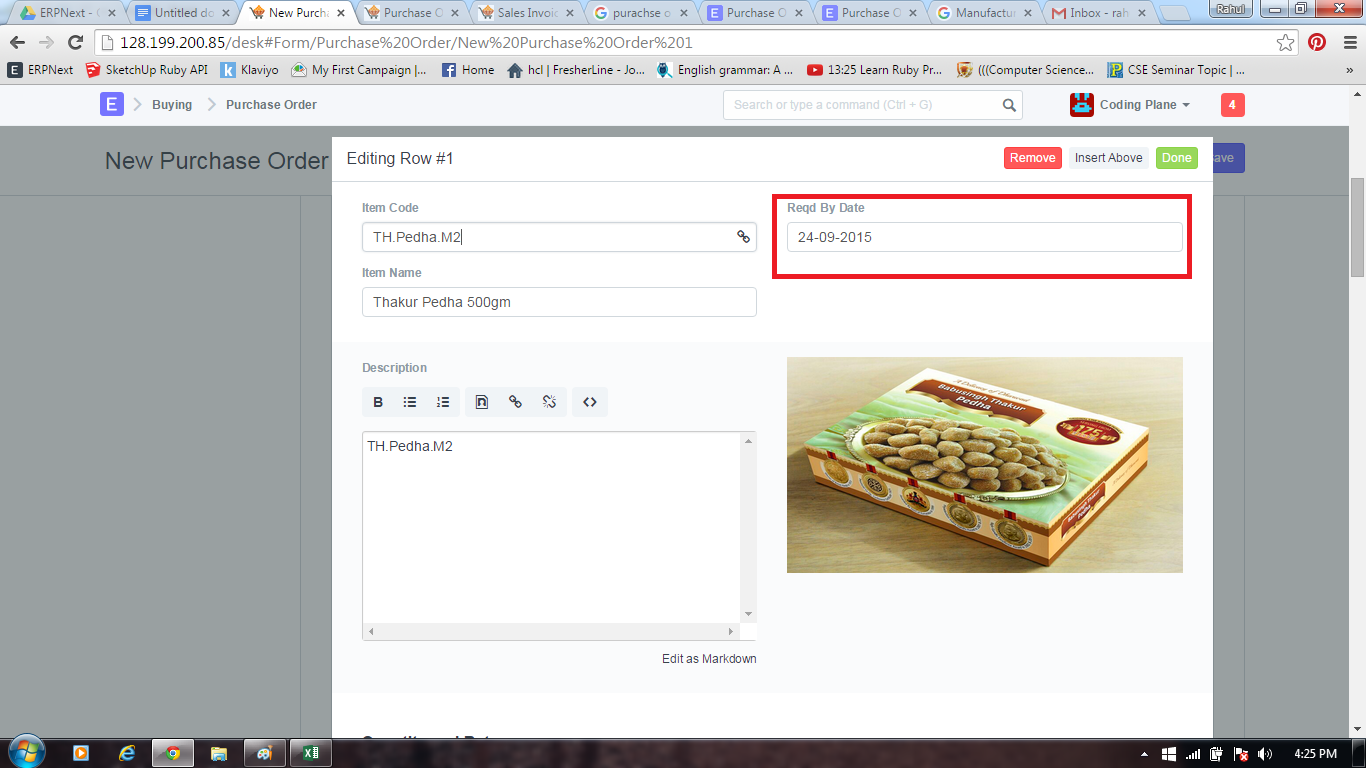
While adding Items you can see Reqd By Date, Here you can enter the date when you want that Item

2)While adding Item you can add Item quantity,Rate,UOM also.
Sometimes your Stock UOM and Supplier UOM varies, For example your supplier sends item in terms of UOM Box and and you maintain that item in Nos ie your Stock UOM, that time you can use Conversion Factor

in the above diagram you can see seller UOM is Box and our UOM is Nos. 1Box=10Nos so in UOM Conversion factor we entered 10. Here our suppliers send 10Box of item and 1Box contains 10Nos means we will receive 100Nos unit of item so in the above diagram you can see Qty as per Stock UOM is 100. If you want you can also add Project Name,BOM. Mention the warehouse for which you are buying the Item.

3)You can also add Taxes like VAT(Value Added Tax) in Purchase Order(PO). Your supplier will charge tax for you and the same you will charge to your customer.

In Taxes and Charges Field you can add expense account head,Tax amount rate,Description etc

In the above diagram you can see how we added Tax account head and its rate. You can create separate account head for Taxes.
4)After entering all data Save and Submit the form. From Purchase Order you can create Purchase Receipt and Purchase Invoice


Tuesday, 14 June 2016

How to enter online transactions in ERPNext?

If you are selling goods online and you are receiving payments online through any payment gateways like Payumoney,Paytm,CCAvenue and you are paying TDS for that then here is the solution for how to enter online transaction in ERPNext.


Step1) Consider that if you are a selling a product for Rs 250 then you have to create sale invoice for Rs 250 only. Customer will pay full amount for that and TDS amount will be deducted when transaction completes(ie When you receive that amount in bank).
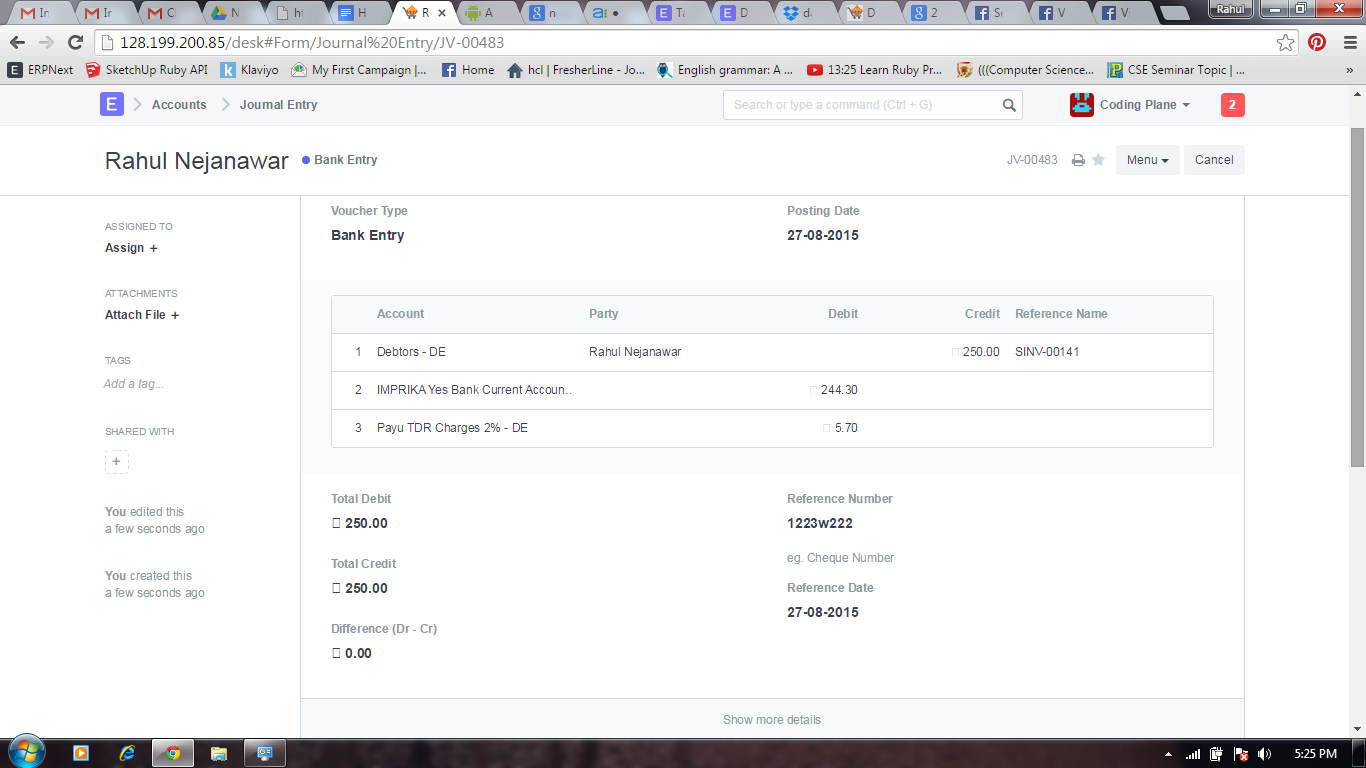
Consider that  you are using Payumoney payment gateway and payumoney charges 2% TDS and 14% tax on that. If customer pays 250 then payumoney charges 2% on that ie Rs 5 and 14% Tax on that ie Rs 0.7. Total Payumoney charges is Rs 5.7 and you will receive Rs 244.3 in bank.
Step2) While entering JV the Customer Account should be in credit side and your bank account should be in debit side and TDR charges will be in debit side.
mail12.png
Your JV should look like above.


How to create Journal Entry in ERPNext?

All types of accounting entries are made using the Journal Entry or Journal entry is an entry to the journal. Journal is a record that keeps accounting transactions in chronological order, i.e. as they occur. Ledger is a record that keeps accounting transactions by accounts. Account is a unit to record and summarize accounting transactions.
Follow these steps to create Journal Entry in ERPNext


1)Goto Accounts->Journal Entry->New
mail67.png
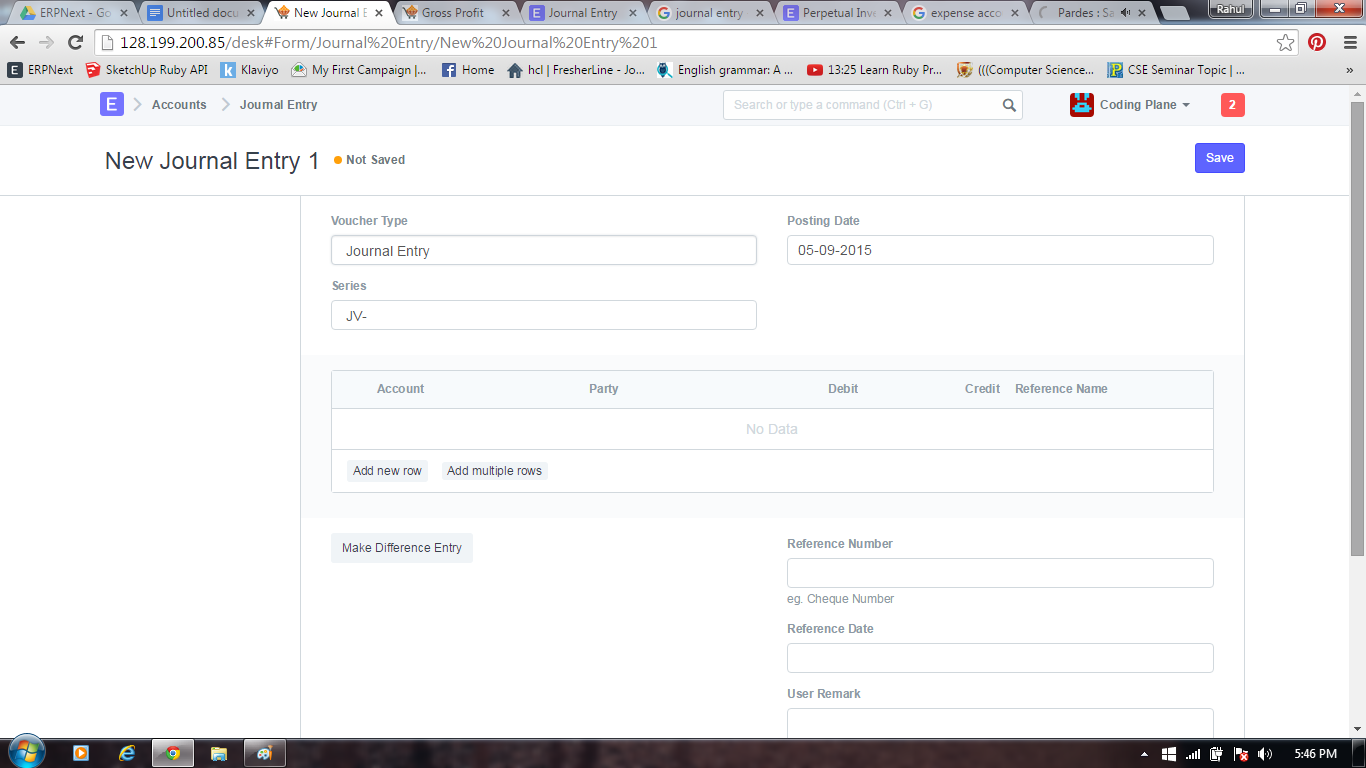
you can see in the above figure,
In the New Journal Entry
Voucher Type-Here select the voucher type like if you doing entry for bank transaction then select Bank Entry or if you are entering cash transaction  then select Cash Entry in Voucher Type
Posting Date-On which date you are posting the JV/Journal Entry
2)Add Accounts details in accounting field
mail68.png
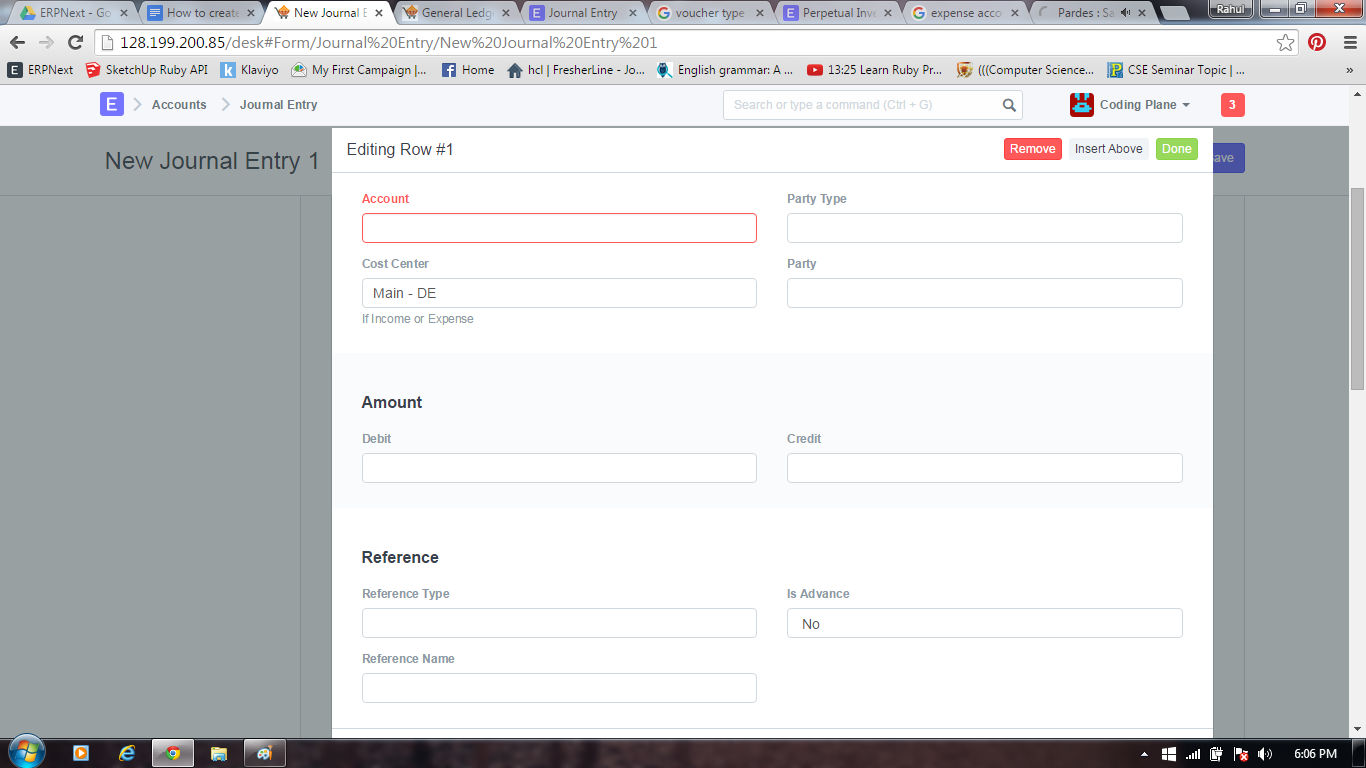
In the above figure you can see
Account-Select respective account head
Party Type-Here Party Type means Supplier/Customer
Party-Select the party name
Cost Centre-Select Cost Centre for income/expense
Amount-Enter the amount to Debit/Credit
Reference Type-Select the reference type like sales invoice,purchase invoice,journal entry
Reference Name-Select the reference name like sale invoice no/purchase invoice no
Is Advance-Select “No” if you are not taking advance amount or Select “Yes” if you want to make selectable in an invoice.


3)After adding rows for individual account entries,Credit/Debit amount,Reference,the Journal Entry look like
mail69.png
In the above diagram you can see, Debitor and Creditor accounts and amounts. Creditor and Debitor amount should be equal, otherwise it will show difference amount in Difference field(Difference(Dr-Cr)) and also you cannot submit Journal Entry.


Difference(Dr-Cr)-The “Difference” field is the difference between the Debit and Credit amounts. This should be zero if the Journal Entry is to be “Submitted”. If this number is not zero, you can click on “Make Difference Entry” to add a new row with the amount required to make the total as zero.


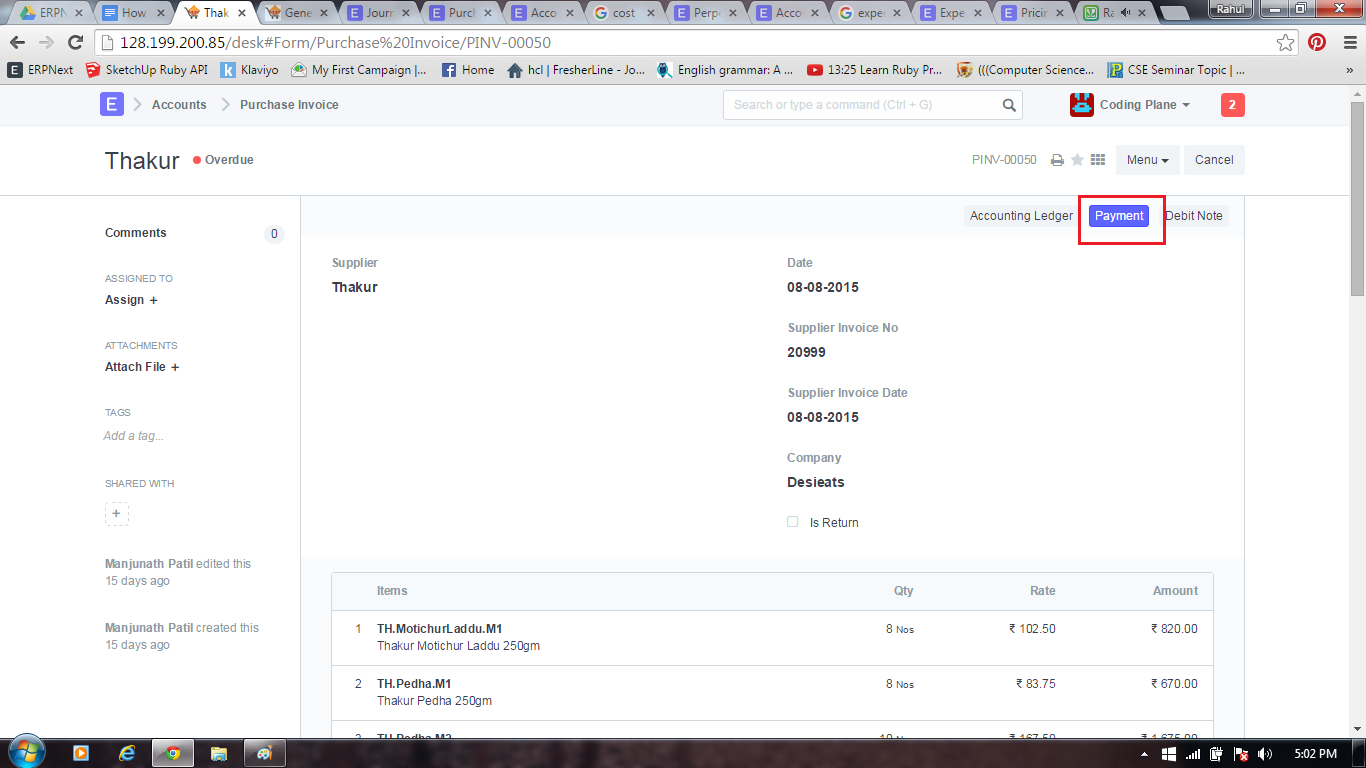
4)From Purchase Invoice/Sales Invoice you can create/generate Journal Entry/Payment Entry
mail66.png
In the above diagram you can see,you can create/goto Journal Entry by clicking Payment button in Purchase Invoice and it is same in Sales Invoice also.


5)Here you can see some common journal Entries for Food and Beverages/Telephone Bill/Rents
mail70.png